Saturday, December 31, 2011

Christmas Card Grand Finale

Happy almost new year! I was so busy making Christmas cards & doing family stuff that I never got around to posting anything. So.... these are some of my Christmas cards I sent out....

I have a real problem with mass producing cuz I want everyone's card to be unique. The drawback is it takes me sooooo much time, lol. But the good thing is I'm very fortunate to have lots of time to craft.

I managed to crank out 35 original designs. I sent our photo card to 60 people, which was my original goal of sending a handmade card with each photo card (you can see the photo I'm referring to on my last post). However, I think I should have started in September in order to accomplish that feat!

Anyway.... I will post each card with its description underneath....


The card base is white cardstock from WalMart & it measures 4 x 5". All of the paper was printed & cut with my Cricut Imagine machine, from the "Snow Angel" cartridge. The tree is cut at 3". I used my Cuttlebug "Swiss Dots" folder to emboss the brown layer. I used a Viva Decor Pearl Pen in "ice white" to make the little pearls. The rhinestone star is from my stash & the corners were chomped with my Fiskars corner rounder (small).


This card base is white cardstock from WalMart & it measures 4 x 5". All the patterned paper is from the DCWV "Homemade Christmas" stack. The tree was cut at 3.5" with my Cricut Expression machine, from the "Joys of the Season" cartridge. I also used some Stickles in "Candy Cane" for the outlines & dots. The twine is "Maraschino" from The Twinery.


The base of this card is white cardstock from WalMart & it measures 4 x 5". The rest of the card was done on my Cricut Imagine machine with the "Snow Angel" cartridge. The silver snowflake in the center is a brad from my stash. The scalloped corners were done with a Fiskars corner punch & the twine is "Honeydew" from The Twinery. I outlined & accented with "Cotton Candy" Stickles & a Pearl Pen in "ice white".
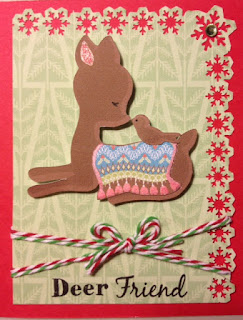


This card base is made with red Coredinations cardstock, size 4 x 5". The background layer & the deer/bird image are printed from my Imagine "Snow Angel" cartridge & the background layer is punched with a Martha Stewart punch. The twine is from The Twinery. The stamped sentiment is 2 seperate word stamps, both from the K Andrew Designs "Winter Wishes" stamp set. Her stamps are truly awesome & her sets have so many mix & match options it's almost endless!

Well.... I think that's a pretty good sampling of the cards I did this Christmas. I hope you enjoyed them & thanks for stopping by!

HAPPY NEW YEAR!!!!!

Thursday, December 15, 2011

Happy Howl-idays!

Hi friends! I just thought I would share our Christmas card photo with you guys. My poor babies were not very happy about it (except Hugo, who seems to enjoy workin' it for the camera)! Every year I make them dress up & wear antlers or some silly thing but they are always good little troopers & tolerate the torture (barely)!......

Haylee (3), Hugo (5) & Lexi (11)


Tuesday, December 13, 2011

Quick Altered Comp Book

Howdy! I just threw this together for my friend's birthday & thought I would do a quick post & share it. This was really easy & took me about 20 minutes to do....


The color really doesn't represent well here as it is actually a brighter pink in person. I used a standard 7 x 9.75" comp book & covered it with a patterned paper from the DCWV "Madly in Love" stack. The ribbon on the edge is from my stash. I did her name using my Gypsy, the internal cartridge "Gypsy Font" & the welding feature. I also covered the back with a coordinating pattern from the same stack....


That's it! Super easy peasy! Thanks for stopping by!
                                                    

Sunday, December 11, 2011

A Christmas Card....

Hallelujah!! I finally figured out how to get bigger pictures on here!! There was an issue with my browser apparently, but thanks to those of you who sent me their suggestions!

This is a card I did earlier today when I couldn't decide which image I wanted to use next (anyone else suffer from this problem??) The result? A very busy card! I know this particular reindeer is a very popular image but I just love him so much that I have to use him at least once every Christmas....

 
This card is 4-3/4" square (don't ask about the weird size - I had some issues, lol). The background papers are from the DCWV "Merry Christmas Stack" & the background scalloped image is from the "Songbird" cartridge (p.61) & was cut with my Cricut Expression machine. All the other images were printed & cut with my Cricut Imagine machine. The reindeer is from the "Create A Critter" cartridge & is cut at 2-1/2". The tree is from the "Winter Frolic" cartridge & is cut at 3". The lights are also from "Create A Critter" & are cut at 1-1/2". I used several different colors of Stickles & some Glossy Accents for the antlers, hooves & spots.

Well.... I think that's it for today! I'll be posting more cards & projects throughout the week...
And, of course, a continued happy holidays to everyone!

Wednesday, December 7, 2011

Christmas Name Tags

Hello!! I hope everyone is having an awesome Wednesday! It's a beautiful day here in my little corner of the world...

I know I just did a post on name tags a couple weeks ago but people keep asking me to make them & I keep crankin em out! This pic is of some of the ones I did for a friend to tie onto her family's Xmas stockings. I did 12 of them total but you get the idea from looking at these 4....

By the way, that reminds me.... does anyone out there know how to make iPhone photos bigger on a Blogger post? If I try to make it any larger than "original size" it gets really distorted.... If anyone has any wisdom on this subject I would really appreciate some feedback! Thanks! ....


These were all done with the Cricut "Speaking of Winter" cartridge, using the base & layer features, cut at 2". All the lettering was printed & cut on my Cricut Imagine machine & the tags are from the Cricut "Plantin Schoolbook" cartridge & cut with my Cricut Expression machine (and Gypsy of course!) from heavy white shimmer cardstock. The tags were cut at 3" in height with lengths varying from 7-8". I used some Stickles in "Diamond" & the ribbon is from Celebrate It (by Michaels). Finally, the edges were inked with Studio G ink in bright red & deep green.

Thanks for stopping by & have a great rest of the week!!

Sunday, December 4, 2011

Happy Birthday Chick!

Hello my peeps! I hope everyone is surviving yet another holiday season.  We are just trying to keep everything grounded here at the ranch during these horrible wind storms! I seriously think I saw a chicken blow by me yesterday, he he he. All I can say is thank God Vinny cut back the GIANT Valley Oak tree that was literally hanging over our house!

Anyway, this is a card I made for a friend's birthday the other day. . . . .


This card was actually super easy & quick! I held off on getting a Cricut Imagine machine for so long because I thought it took away so much of our creativity. However, I find that it is an awesome supplement to my Cricut Expression because sometimes you just need a quick card & don't have time to pick out all the different papers (which is exactly what happened in this case).

This is a combination of 2 different images on the Imagine More Cards cartridge. The card base is from the 1st layer of the image on p.25 & the rest is from the images on p.10. The card base is cut at 4-1/4" & the other images are cut accordingly. The twine is "Cappucino" from The Twinery.

Thanks for stopping by!. . . . .

Monday, November 28, 2011

More Llama Drama....

Hello again! I just realized I never followed up about our poor lonely llama, Lily. Well . . . about 2 weeks ago we finally got her a new friend! This is Dahli . . . .


And here is a video of her first meeting with Lily (the white one), who is acting like a stuck up b-word in this clip but she's slowly getting used to her new friend . . . .


Have a great day!!

Sunday, November 27, 2011

I'm baaack!! (with name tags)

Hello everyone! I have not blogged in almost 2 weeks so I'm gettin back on the proverbial horse today. I've been super busy, as I'm sure everyone is this time of year. On top of that our internet was out this whole past week. There are very few drawbacks to living in the boonies but the biggest one would have to be our internet situation (followed closely by mountain lions). We're not on satellite anymore - thank God! but this new internet provider we have consists of 3 guys & a tiny office. So when our internet goes out over the long holiday weekend there's no one answering the phones till Monday. Luckily it just miraculously came on about 3 hours ago. I was totally freakin out! I mean tomorrow is Cyber Monday for Pete's sake! And this chick is all about the online shopping! I haven't been in a mall in years & I will do everything within my power to keep it that way.

Plus......I'm a huge QVC & HSN junkie. I have one or the other streaming live on my laptop pretty much every waking hour. Oh yeah.... and I also have a little eBay addiction problem. The hubster has to cut me off occasionally when I get out of control, lol. But now I'm rambling so on to the project we go!.....

Some family friends of ours asked me to make these name tags to put on the front of their shoe baskets in their mud room (very Pottery Barn-esque I know). They still need to be mounted to a wood background but that's Vinny's department! Once they're mounted to the wood we will (he will) drill 2 holes in the top so we can use a ribbon or wire to attach them to the baskets. I love doing personalized stuff like this for people! It's so much fun figuring out a color scheme, size, font, etc. And it gives me a chance to reflect their individual personalities a little bit. So..... here are the pics......
Here is a quick summary of the elements I used:  all paper from DCWV & ColorbokCricut cartridges: Songbird, Gypsy Font, Feeling Groovy, Cuttin Up & Calligraphy. I used Aleene's Paper Glaze to give the names some dimension. The size of each tag is 6-1/4 x 3".

Thanks for visiting me & have a fabulous week!

Sunday, November 13, 2011

Imagine Paper Sample Ring Thing-y

Howdy! So the iPhone is here, activated & ready to rock! It's definately gonna take some getting used to but I think it's gonna be more awesome than I can imagine. Speaking of imagine (oohhh.... check out that segway huh?) Today I'm displaying this Imagine paper sample ring I made. I actually lifted this idea from Robyn at My Pink Stamper but I thought I'd show you how mine looks completed. You can check out her video of this project HERE. So here we go!....

This is what it looks like all put together....

I used this snap ring thingy, which you cannot find at WalMart (Robyn mentions getting them at WalMart in her video), at least not at the WalMart in Windsor, CA. I ended up getting these at Beverly's & they're made by 7 Gypsies. I got a pack of 10 for like $7 I think.  

All I did was print out all the patterned paper on each Imagine cartridge I have. They all have 20 patterns per cartridge. I just selected the square shape from the pre-loaded images on my Imagine, set at 2" & popped in each pattern. It's a little time consuming but soooo worth it! At the 2" size all 20 patterns on the cart will fit easily on one page. I wrote the name of the cartridge on the back of each square (you could use computer labels if you want). Then I punched a 1/4" hole in all of them, put them on the ring & voila!! I organized mine by color within each cart but you can obviously do it however you want.

I was a bit skeptical on whether or not this would really help me but it has already helped me so much! I don't have to flip thru the books to coordinate my paper patterns. Plus it makes it super easy to coordinate patterns from different cartridges.

I hope you enjoyed my little OCD project! Lol....

Saturday, November 12, 2011

iPhone-tabulous!

Hello there! I have been holding off on posting anymore pics cuz I'm so tired of the crappy pics my Blackberry takes. However, the long awaited moment is finally here.... my iPhone 4s came today! Unfortunately we are unable to activate it till tomorrow cuz the Verizon activation server is down :( But I've waited this long so what's another few hours?! Anyway, my point is I will be taking some hopefully fabulous pics of my latest cards & posting them over the next couple days, so stay tuned!.......

P.S.  I don't know if anyone else out there likes Pit Bulls but I am obsessed with them! Anyway you can check out the new iPhone cover I bought HERE.  Get it? Hello Pittie instead of Hello Kitty? Ha ha ha! I crack myself up! This site is awesome for all kinds of things, you should check 'em out http://www.cafepress.com/

Sunday, November 6, 2011

To the Bloggers I Follow.....

Hi my favorite peeps! I just wanted to post this real quick cuz I'm having problems with my blogger page erasing my "blogs I follow" section. I had entered over 20 blogs & now it has dropped everything except for 8 of them. I've tried re-entering them but it always goes back to the same 8. I can't figure out what the heck is going on but I just wanted to tell everyone I follow that I didn't purposely drop your blog from my list. I don't know if I still show up as a follower even though it's not listed but I will find out what's going on & get all my faves back on my page! Maybe someone else out there has had this problem? If so any advice would be greatly appreciated cuz it's really irritating me! Thanks!

Friday, November 4, 2011

The Cutest Couple EVER!

Hello hello hello! I hope you are having a fabulous Friday & looking forward to the weekend. I sure am & the best part is I have noooo plans.... can you say craft-a-thon?! LOL. We recently retired from a business we had & it's so exciting to have so much "me" time now!

Today's card is one I made for my hubby for our 5th anniversary. I'm cheating a little cuz our anniversary was back in August but I just love this card & had to share it anyway. I just love it when my cards turn out way better than I thought they would. It doesn't happen all that often but it's cool when it does! And since I always have to make excuses for my crappy Blackberry camera my hubby just ordered me an iPhone! It won't be here for a week or 2 but when it does I'll finally be able to post decent pictures that are bigger than a damn postage stamp! Can't wait!


OK so here are the details of this card.......
This is a 5-1/2" square card. I rounded the edges with my Fiskars small corner punch. The card itself is just made from some white cardstock from my stash. The black 1st layer & the grey & black on the dude are from DCWV's "Black Currant" stack. The cardstock used for the 2nd base layer & the sentiment are from DCWV's "The Luxury Stack". The bride, groom & sentiment are cut with my Cricut Expression Pink Journey Edition machine & designed on my Gypsy. The bride is cut at 3" & the groom is cut at 3-1/2" (they are both from the Cricut "Simply Charmed" cartridge).The sentiment is from the Cricut "Beyond Birthdays" cartridge, cut at 1-1/2".  I used Stickles (which I got from Beverly's but they're available lots of other places too) on the bride's headband & flowers. I embossed her dress with my Cuttlebug V2 using the "D'Vine Swirls" folder (I love this folder & use it more than any other). The loopy punch on the bottom is from Martha Stewart. The ribbon is from my stash & the 3 little white pearls on the ribbon are too. The white faux stitching is done with a white Uniball Signo pigment ink pen.

Well..... I think that just about covers it. Thanks for stopping by & I'll see y'all again real soon! Have a great weekend!.......

Saturday, October 29, 2011

MY CREATIVE TIME Design Team Submission

Well hello there! I hope you are having a wonderful weekend! I have had the perfect Saturday - sleep in, eat, snuggle my doggies, then craft all day & night! Anyway, this pic is my submission for Emma Aguilar's MY CREATIVE TIME design team. Check out her website HERE. Her designs are amazing & she has her own line of stamps & dies!


Here are the deets for this card: size is 6.5 x 5", all patterned paper, including the card itself, came from the K & Company stack called "Small Wonders Boy" except the blue paper inside the fish bowl is from the Cricut Imagine machine cartridge "Enjoy the Seasons". The fish embellishment is from my stash but I don't remember where it originated. The fish bowl was printed & cut at 3" with my Imagine machine. The "Just Keep Swimming" sentiment is from the Cricut "Four Legged Friends" cartridge & was cut out on my Cricut Expression machine Pink Journey Edition, using 3 different colors of gingham paper. I don't know where the ribbon came from but I think it's one my mom bought me at the Flower Market in SF a while back. I used some Smooch Pearlized Topcoat to add some sparklies to the lettering & parts of the fish. I inked the edges of the base layer with some Martha Stewart ink. 

I realize I probably won't get chosen for this design team because I just started my blog less than 2 months ago but I really enjoy trying anyway. After all, it's all about fun & supporting this great community of paper crafters we have! Thank you Emma, for the opportunity. I had lots of fun!

Wednesday, October 26, 2011

Llama Drama

Happy Wednesday everyone! I just wanted to post this pic & tell a real quick story about it.....  So we had 2 llamas & 1 just died last week (she was really old). This is Lily Girl & she has been really sad cuz she misses her friend. We are working on getting her a new llama friend ASAP cuz llamas can die from depression if they don't have a buddy to hang with. Right now she has some cow buddies but it's not the same. This is one of my Pit Bulls, Haylee checkin out Lily. Haylee will normally chase the llamas but she must know Lily is sad cuz she has just been really sweet to her lately. Animals never cease to amaze me with how intuitive & emotionally connected they are.... (sorry for the crappy tiny picture but Vinny took this with his phone so it's really blurry if I enlarge it).....

Saturday, October 22, 2011

Happy Birthday Mom!

I just wanted to do a quick shout-out to my sweet Mommy cuz it's her birthday today!! HAPPY BIRTHDAY!! WE LOVE YOU!!


Wednesday, October 19, 2011

Call of the Wild

Hello again! I haven't posted in several days cuz I've been working on a big project & haven't done much individual card making. However, I was inspired to make this one (see bottom of this post) because of an incident a few nights ago. As most of you know we live in the boonies on top of a mountain on 300+ acres. Anyway, we were awakened at 4am by our dogs jumping off the bed, barking & going nuts. Then it was so weird - Hugo (our Jack Russell) started howling, which I've never heard him do before. Once we got the dogs quieted down (except Hugo who wouldn't stop howling) we heard what was going on outside. There was a lone coyote howling & squawking like crazy & he was almost in our back yard area! Hugo was answering the call of the wild!

We have cattle running in a pasture which is very close to our house. They chill in the area by our house at night. This coyote was obviously calling for his buddies - because 1 coyote can't take down a cow by itself but with some friends they could easily get one of the calves. Anyway, Vinny got his gun & went out to take a look around. 5 minutes later I heard a gunshot & the howling stopped immediately. Don't worry he didn't shoot it, he just fired off a round into the ground to scare it, which worked nicely! He checked the cows & everyone was fine. Phew! We managed to get a couple more hours of sleep luckily!

So that's the story behind this card. For the images I used the Cricut "Live Simply" cartridge for the skunk & the owl/tree (the tree is embossed with the Cuttlebug "D'Vine Swirls" folder) & I used the "Paper Pups" cartridge for the howling dog. I used "Plantin Schoolbook" cartridge for the grass & the paper, moon & stars are from my stash. This is a standard A2 size card which is 4-1/4 x 5-1/2". Well, hope you enjoyed hearing about my drama up here in the woods! Thanks for visiting....


Wednesday, October 12, 2011

Paws-itively Grateful

Happy Wednesday everyone! I thought this thank you card was appropriate for how I am feeling lately. There are some nice & unexpected developments happening for Vinny & I, which I can't mention here but it's all good! In my dog news today I have great news! Lexi got her cast/splint off - finally! She has a little bit of a limp but it seems to be improving. She is so happy now she can lay out in the sun on the deck without being on a leash. I'm so glad she's pretty much back to normal..... 
Now.... onto the card o' the day! This entire card was done with my Cricut Imagine machine, except for the paw print & bone brads & the ribbon. The phrases are a mixture of 2 different images, both from the Imagine More cartridge. Actually, all the cardstock is from Imagine More too. This is a standard A2 size card. The ribbon is from Shibata Floral & the brads are from Recollections (love these brads!). It's alot cuter & brighter in person - as usual my Blackberry camera sucks! I'm resisting the iphone craze but it might be time to give in (sigh.....). Anyway, I hope you all have a wonderful 2nd half of the week!
                                                                   

Saturday, October 8, 2011

My Pink Stamper Christmas Challenge

 Hello! This card is for the My Pink Stamper Christmas challenge. You can check out the MPS website HERE. Yes, I said Christmas! Geez..... where does the time go?!? This challenge has prompted me to get an early start on my Christmas cards which is fabulous! Anyway, I used the Joys of the Season cartridge for the house image & the wording is from the Winter Frolic cartridge. Both were done on my Cricut Imagine machine. The paper is from Cloud 9 Design. I used my Ice White Pearl Pen to fill in the windows & accented parts of the house & the wording with Smooch. The house was cut at 3" and the wording was cut at 1.5". I hope you enjoyed this little glimpse of Christmas & have a great weekend!!  


Friday, October 7, 2011

Spooky Calendar

Hello! Today's pic is of a wall/fridge calendar I made for the spooky month of October. I love fall & Halloween so I'm very excited it's almost upon us! I'm a big fan of the rain & cold weather so we're coming into my favorite time of year. Whoo hoo!

Anyway, for this calendar project I used paper/cardstock that I bought last year & I can't remember who's it is but I think it might be Heidi Grace. I love using purple & green along with the traditional black & orange Halloween colors. The pumpkin image was cut & printed on my NEW Cricut Imagine machine (so loving this!) & this image is one of the stock images pre-loaded on the machine. The "October" wording was also cut & printed on my Imagine & comes from the Designer's Calendar cartridge. The spider also came from the Designer's Calendar cartridge. The little bat I actually cut out by hand from a sheet of cardstock by Me & My Big Ideas. All the sparkly accents were done with Stickles and/or Smooch.

Well, there we go! I'll see ya'll later with some more projects! Have a fabulous weekend!

Monday, October 3, 2011

Mini-me!

Hello everyone! I hope you had a great weekend. I had an awesome one myself! Instead of cards today I'm gonna get a little more personal & share about my day with my daughter, Lila. As most of you already know I am not raising Lila because I placed her in an open adoption situation when she was born. And most of you know why so I won't go into it here, but let's just say that her father & I had a lifestyle that was not safe or appropriate for raising a child.

Anyway, Lila is 10 years old now & we went to Livermore yesterday to watch her play soccer. It was so great to see her & she looks more & more like me all the time! She got a phone for her 10th birthday in June & we have been texting each other, which is so fun! We're planning on spending alot more extended time together in the near future which I hope will be a good bonding opportunity for the 2 of us.....

I'm very excited for this next chapter of our relationship! I've been looking forward to this time for many years now & I'm thrilled that it's finally here!

Anyway, happy Monday & I'll be posting some more cards this week so stay tuned!

Oh yeah & HAPPY BIRTHDAY TO MY GRANDMA TODAY!!!

Wednesday, September 28, 2011

Love is Always in Season

Happy Wednesday everyone! So since my last post I have realized it was kinda dumb of me to post my thank-you card pics since several of the people reading this blog will be the recipients. Duh! So I'm gonna wait on posting those till later....

Anyway....the post today is a card i just created this week. It's actually a big card at 6x6" square & this picture really doesn't do it justice (probably cuz I'm still using my Blackberry as my camera). Anyway, I got the lettering & all the paper from DCWV's "The Whimsy Stack" (loving this!) and the pearl-looking dots are done with my Pearl Pen in ice white. The black faux stiching was done with my Signo pen.

OK so after the deer drama a few days ago things have been pretty quiet around here. There's lots of work going on here at the ranch & things are really looking beautiful! I didn't think it could get anymore beautiful here but it is! Vinny & his crew are really outdoing themselves & I'm constantly amazed by Vinny & his amazing work. The most exciting part is that next summer we will have a big swimmin pond right outside our front door. Just need the rain to fill'er up this winter. Anyway, I hope you all have a fabulous end of the week!....

Sunday, September 25, 2011

Thank Ewe & Deer Drama

Hello again! I hope everyone had a fabulous weekend! Mine was mellow but for me that's perfect. I've been working on thank-you cards from my birthday & thought I would share some with you....

This card was cut at 5-1/2" square. The sheep image is from the "Just Because Cards" Cricut cartridge, cut at 2-1/4" & the paper is from the Martha Stewart "Vintage Girl" stack. The ribbon is from Michael's own label & the mini pearls are from Me & My Big Ideas.

Sooo... had a little wildlife drama up here at the ranch yesterday!... 2 of my dogs, Haylee & Hugo cornered a deer in the vineyard (yes, Vinny left the gate open all day). It was obviously panicking & hit the fence hard a few times. It had Haylee pinned down on the ground with its antlers, yet somehow she doesn't have a mark on her! Talk about lucky! Hugo pretty much just pulled on its ear, lol. That little dog has a death wish I swear! Anyway, the deer finally got away & ran out the gate but he was bleeding pretty bad from his mouth from hitting the fence. We have been so worried about this poor buck out there suffering, but then Vinny saw him this morning & he was grazing & looked perfectly fine. Whew! Moral of the story: don't leave the damn vineyard gate open!

Well that's enough excitement for one weekend I think. I'll be checking back in with some more thank you cards this week.....

Tuesday, September 20, 2011

Happy Birthday!

Hi there! We have had many birthday celebrations this month (including my own 37th, which I'm still in denial about). Our God daughter Olive turned the big 3 & our other God daughter Theresa turned 18! This is the birthday card I made for Theresa....

For this card I used the Cricut cartridge "Simply Charmed" for the cake image, cardstock/paper is from Martha Stewart's "Modern Festive" paper pad & DCWV's "Lemon Flower Stack". The background embossing was done with my Cuttlebug "D'Vine Swirls" folder & of course lots of Stickles & rhinestone bling. Oh how I do love the sparkly stuff!

Anyway, I have lots more projects in the works that I will be posting this week so stay tuned & have a fabulous day!!

Sunday, September 18, 2011

My 1st Post!

Hello friends! I just started this blog (obviously) & I hope to make it a place where I can share my cards & throw in a little personal stuff too. I also have "blinkies" (links) on the sides of my page to some other websites/blogs that I follow & find very informative & fun.

I will still be doing my Facebook page (Leelee Card Designs) but I'm going to use that more as a comprehensive gallery of all my work past & present, with new albums every month. I want this blog to be more of a "hot off the press" format. So I'll probably only be posting 1 or 2 pictures at a time & they will always be of new original designs I have just created.

I make my cards because I love doing it but it's also very therapeutic for me & it just makes me happy! I welcome comments, feedback & questions so don't be shy! Lord knows I'm not! OK well.... thanks for checkin me out & I'll see ya real soon on my next post....